Skip ahead to
- Overview
- Setting up Authorize.Net in WSM
- Processing Authorize.Net payments on new orders
- Modifying existing Authorize.Net payments
Overview
Authorize.Net is one of the oldest and most popular payment gateway providers for eCommerce. The service enables small businesses to process payments using credit, debit, and electronic check transactions.
Setting up Authorize.Net in WSM
To use Authorize.Net as your payment provider, you first need to obtain a merchant account with Authorize.Net and attach it to your store in WSM.
Disabling Test Mode for Authorize.Net
Your Authorize.net account is in Test Mode when you open a merchant account with them. The test servers aren't compatible with Web Shop Manager, so you need to disable Test Mode for your Authorize.Net account.
- Log into the Merchant Interface at https://account.authorize.net.
- From the main menu, select Account > Settings.
- Under the Security Settings section, click Test Mode.
- Click Turn Test OFF to disable test mode for your account.
After you disable Test Mode, you can activate Authorize.Net in Web Shop Manager.
Activating Authorize.Net in WSM
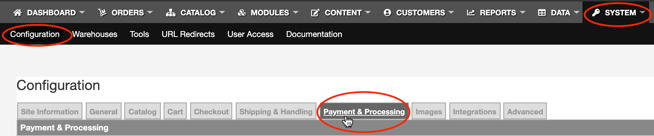
- In Web Shop Manager, hover the mouse over System and click Configuration.
- Click Payment & Processing.
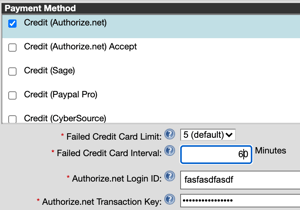
- In the Payment Options section, select Credit (Authorize.net) as your payment method.
- In the Failed Credit Card Limit field, select the number of failed credit card attempts allowed for each transaction. If a customer exceeds this limit, the order status locks and the customer must contact support for assistance.
- In the Failed Credit Card Interval field, select the number of minutes that Credit Card Fraud Protection lasts before expiring.
- Enter your Authorize.Net Login ID and Transaction Key.
- In the Credit Card Types section, select the credit card types you would like to accept as payment (MasterCard, Visa, American Express, Discover).
- In the Sales Tax States section, select Charge Tax for all states that you would like to charge sales tax.
- Click SAVE CHANGES.
Processing Authorize.Net payments on new orders
Web Shop Manager uses integrated Authorize.Net payment features in the Payment Information section of each order, allowing you to view and process Authorize.Net orders in one place.
Viewing new Authorize.Net payments in WSM
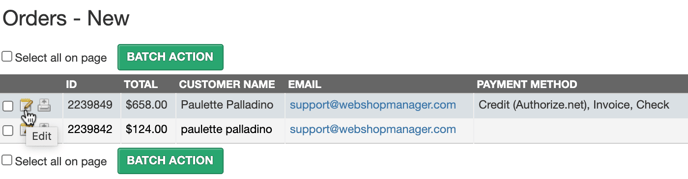
- In Web Shop Manager, hover the mouse over Orders and click New.
- Identify the new Authorize.Net order you wish to view and click the Edit icon
 .
. 
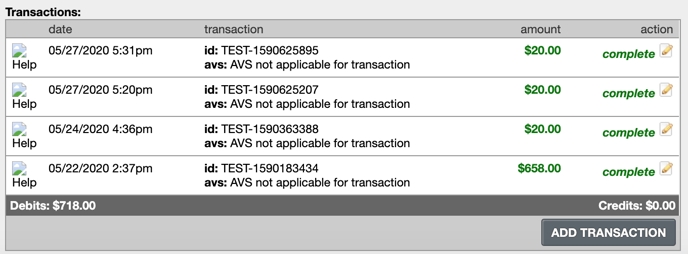
- In the Payment Information section, scroll down to Transactions.
Verifying new Authorize.Net payments in WSM
Authorize.Net provides basic fraud protection using AVS (Address Verification Service). AVS is a standard credit card verification feature that compares a customer's billing address for a credit card transaction with the billing address on file for the cardholder at the credit card issuing bank. -Read More
In Web Shop Manager, the AVS field displays a response code for the transaction generated from Authorize.Net.

The following response codes are possible:
| AVS Code | Description |
| A | Address (street) matches, ZIP code does not |
| B | Address information not provided for AVS check |
| E | AVS error |
| G | Non-U.S. card issuing bank |
| N | No match on address (street) and ZIP code |
| P | AVS not applicable for this transaction |
| R | Retry – System unavailable or timed out |
| S | Service not supported by issuer |
| U | Address information is unavailable |
| W | 9 digit ZIP code matches, address (street) does not |
| Y | Address (street) and 5 digit ZIP code match |
| Z | 5 digit ZIP matches, Address (Street) does not |
Response code Y (Address and 5 digit ZIP code match) is the preferred result. AVS response codes B, E, G, N, R, S, U are rejected by default in the Authorize.Net payment gateway.
For more information on adjusting transaction rejection settings, see Authorize.Net Support Center.
Authorizing and Capturing Authorize.Net payments
By default, Authorize.Net handles the authorization and capture of payments automatically with the AUTH_CAPTURE (Authorize and Capture) transaction type setting. Once approved, these transactions are placed in Unsettled Transactions with the status Captured Pending Settlement. Settlement of these funds occurs automatically every 24 hours.
There may be situations in which you need to authorize a payment to make a sale but cannot ship merchandise for several days. In these situations, you need to set the transaction type to AUTH_ONLY (Authorization Only). This setting allows you to authorize the payment immediately and capture later when the merchandise is ready to ship.
An Authorize Only transaction may be created through the Virtual Terminal in your Merchant Interface, or scripted through your website using the field x_type, set to AUTH_ONLY.
🔎 Note: Authorization for AUTH_ONLY transactions is valid for 30 days. If the authorization exceeds 30 days with no merchant action, its status changes to Expired. Once expired, the transaction is no longer available for settlement.
Manually capturing Authorize Only transactions
- Log into your Merchant Interface.
- Click Unsettled Transactions in the main left side menu.
- Click the transaction ID for the transaction that you wish to capture.
- Click Capture. A pop-up window titled Capture Transaction appears.
- If desired, adjust the Settlement/Capture Amount. Note that you may only adjust the amount to a lesser value. The transaction cannot be settled for more than the original authorized amount, but may be settled for less than that amount.
- Click OK.
Completing a new Authorize.Net order in WSM
For information about adding products, promotions, and tracking information to an order, see Edit Order Page.
Modifying existing Authorize.Net payments
Refunding Authorize.Net payments in WSM
Web Shop Manager makes it simple to refund an Authorize.Net payment.
- In Web Shop Manager, hover the mouse over Orders and click All Orders.
- Identify the Authorize.Net order you wish to refund and click the Edit icon .
- In the Payment Information section, scroll down to Transactions.
- Click the Edit Transaction icon and select Refund.

Changing credit cards on Authorize.Net payments
For information on updating order payments, see Payment Information.