Skip ahead to
Creating photo albums
A photo album is a great way to personalize your business and create a positive brand image. Follow along with this tutorial to learn how to add photo albums and edit images in WSM.
Watch the WSM demo
Adding photo albums in WSM
- In Web Shop Manager, hover over Modules and click Photo Gallery.
- Click ADD ALBUM.
- In the Title field, enter the name of your album.
- In the Description field, enter additional description about the album contents.
- In the Priority field, enter a Priority Number value that places the album in the order you want it to be positioned on your website. Albums are sorted in descending order according to their Priority Number.
- In the Parent field, you can add your photo album to a previously created album by selecting it from the dropdown list.
- In the Template field, select the site template you wish to use for your new album.
- In the Hidden field, click Yes if you like to make the album private.
- Click ADD ALBUM to save your photo album.
Adding images in Site Pages
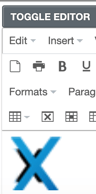
Use the Toggle Editor button to edit your site pages.
To edit images on a site page:
- In Web Shop Manager, hover over Content and click Site Pages.
- Highlight the site page you wish to edit and click the Edit icon
 .
. - Scroll down to the Content section and click TOGGLE EDITOR.
- Click the Insert/edit image icon .

- In the Insert/edit image window, enter the file path of the image in the Source field. You can also enter an image description in the Description field and adjust image pixel dimensions in the Dimensions field.
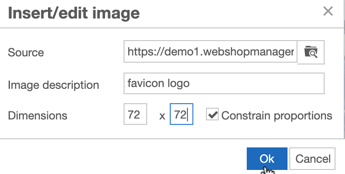
- Click Ok. Your uploaded image now appears in the Toggle Editor.
- Click SAVE CHANGES.