 Overview
The primary purpose of the Shipping Rules UI is to provide users with a user-friendly interface for creating, editing, and managing shipping rules.
By leveraging the Shipping Rules UI, administrators can easily customize and optimize the shipping process to meet specific business requirements and enhance the overall user experience.
The Shipping Rules UI is only available for sites on PBS: Grow or higher plans and/or sites that have a universal API key. Please contact your CSM or submit a service desk ticket if you'd like to verify your site's eligibility.
 Accessing the Admin Panel
-
After successfully logging in to the admin side of your site, locate the "System" tab in the navigation bar and click on it.
-
Within the "System" tab, search for the "Shipping Rules" option.
Click on the "Shipping Rules" option to access the Shipping Rules Index. -
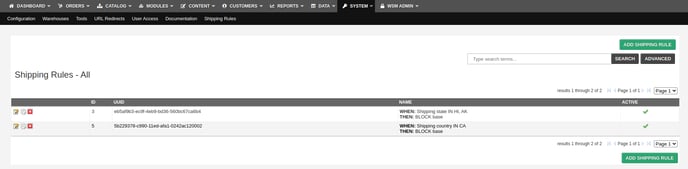
You will now be redirected to the Shipping Rules Index page. Here, you can conveniently view and manage existing shipping rules, as well as create new ones.
⚠️To access the Shipping Rules Index page go to www.yourwebsite.com/admin?view=shippingrules.index or in Admin Dashboard to System → Shipping Rules.
 Creating Shipping Rules
To create shipping rules using the Shipping Rules UI, follow these step-by-step instructions.
Shipping Rules Index page
-
Access the Shipping Rules Index page:
-
Follow the instructions provided earlier to access the admin panel and navigate to the Shipping Rules Index page.
-
-
Start creating a new shipping rule:
-
Click the “ADD SHIPPING RULE” button on the Shipping Rules Index page to begin the process of creating a new shipping rule.
-
Add Shipping Rule page
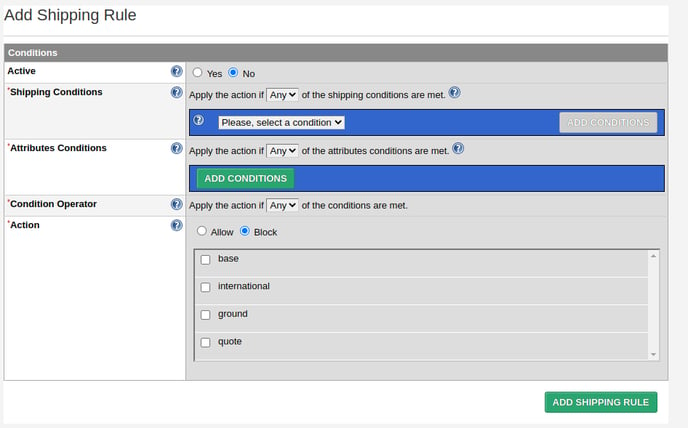
Active
-
Find the "Active" section.
-
Choose whether the shipping rule should be active or not.
-
Select the radio button labeled "Yes" if you want the rule to be active.
-
Alternatively, select the radio button labeled "No" if you want to disable the rule.
Shipping Conditions
-
Look for the "Shipping Conditions" section.

-
This section allows you to define the conditions that trigger the shipping rule.
-
Select the option that applies to your scenario: "All" or "Any"

-
Choosing "All" means that all shipping conditions must be met for the rule to be applied.
-
Selecting "Any" means that any of the shipping conditions being met will trigger the rule.
-
-
-
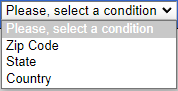
Click the drop-down menu to view the available shipping conditions.
-
Zip Code
-
State
-
Country
-
-
Select the relevant condition from the list.
-
This will enable the “ADD CONDITIONS” button.

-
-
Click “ADD CONDITIONS” to load the selected conditions from the drop-down. (e.g Zip Code)
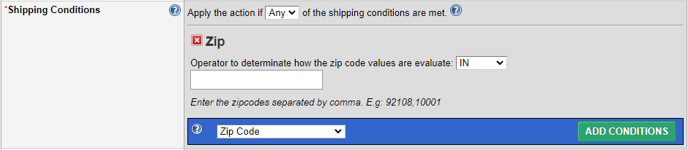
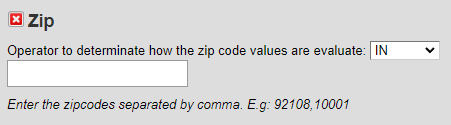
Zip
-
Enter the zip codes separated by a comma and without space.
-
Operator to determine how the zip code values are evaluated.
-
The available options are "IN" and "NOT IN".
-
Examples:
-
Selecting "IN" means that the zip code values should match the entered zip codes. For example, if you enter "92108,10001" and select "IN", the condition will be true if the zip code is either "92108" or "10001".
-
Selecting "NOT IN" means that the zip code values should not match the entered zip codes. Using the previous example, if you enter "92108,10001" and select "NOT IN", the condition will be true if the zip code is not "92108" or "10001".
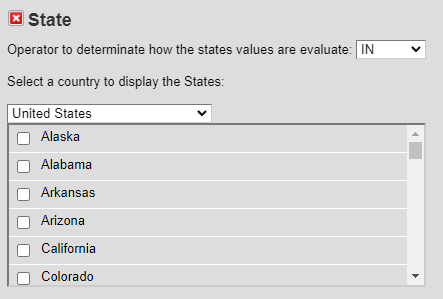
State
-
Selecting a country using the drop-down will display the states of the selected country.
-
Operator to determine how the state's values are evaluated.
-
The available options are "IN" and "NOT IN".
-
Examples:
-
Selecting "IN" means that the state values should match the selected states. For example, if you select "Alaska" from the drop-down menu and choose "IN" as the operator, the condition will be true if the state is Alaska.
-
Selecting "NOT IN" means that the state values should not match the selected states. Using the previous example, if you select "Alaska" from the drop-down menu and choose "NOT IN" as the operator, the condition will be true if the state is not Alaska.
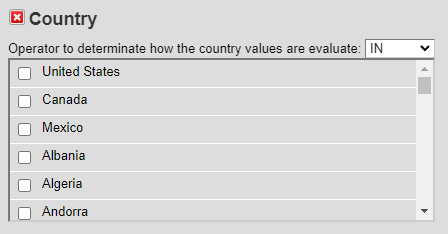
Country
-
Use the checkboxes to select the desired Countries.
-
Operator to determine how the country values are evaluated.
-
The available options are "IN" and "NOT IN".
-
-
Examples:
-
Selecting "IN" means that the country values should match the selected countries. For example, if you select "United States" and "Canada" as the countries and choose "IN" as the operator, the condition will be true if the country is either the United States or Canada.
-
Selecting "NOT IN" means that the country values should not match the selected countries. Using the previous example, if you select "United States" and "Canada" as the countries and choose "NOT IN" as the operator, the condition will be true if the country is neither the United States nor Canada.
⚠️ Use the ![]() button on the left of the conditions names to delete Conditions.
button on the left of the conditions names to delete Conditions.
Attributes Conditions

-
Specify Shipping Conditions:
-
Look for the "Shipping Conditions" section.
-
This section allows you to define the conditions based on product attributes that will be used to trigger the shipping rule.
-
Choose whether "All" or "Any" of the attribute conditions need to be met for the rule to apply.
-
Choosing "All" means that all attribute conditions must be met.
-
Selecting "Any" means that meeting any of the attribute conditions will trigger the rule.
-
-
-
Click the “ADD CONDITIONS” button to open the Attributes subsection.

-
The drop-down menu(s) in the Attributes subsection loads all of the available attributes.
-
-
Select the relevant attribute condition from the list.
-
If required, provide additional details or values for the selected attribute condition.
Condition Operator
-
In the "Condition Operator" section, select whether the rule should evaluate shipping and attribute conditions together as "All" or "Any"
-
"All" means that both shipping and attribute conditions must be met for the rule to apply.
-
"Any" means that meeting either the shipping or attribute condition will trigger the rule.
-
⚠️ Determines whether the rule evaluates the product attribute conditions and the shipping conditions together (AND) or whether it is sufficient if only one of them is met (OR).
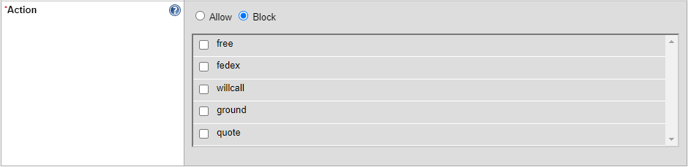
Action
-
In the "Action" section, choose the desired action for the shipping rule.
-
Select either "Allow" or "Block."
-
"Allow" enables only the carriers selected for the shipping rule and excludes all other carriers.
-
"Block" blocks the carriers selected for the shipping rule and allows all other carriers.
-
-
To select specific carriers, check the corresponding checkboxes.
⚠️Specifies which of the following shipping methods will be available to the user once the conditions are met.
Specifies which of the following shipping methods will be available to the user once the conditions are met.
Add Shipping Rule
Once you have configured all the necessary options, click the "Add Shipping Rule" button to save the new shipping rule with the specified conditions and actions. The created shipping rule can be found on the Shipping Rules Index page.
⚠️ To access the Shipping Rules Index page go to www.yourwebsite.com/admin?view=shippingrules.index or in Admin Dashboard to System → ShippingRules.
 Repeat for additional rules
If you need to create multiple shipping rules, repeat the above steps for each rule, considering different conditions, options, or combinations to cover your specific shipping requirements.