What is ShipStation?
ShipStation is a web-based eCommerce shipping platform designed to help online retailers streamline their ability to process, fulfill, and ship orders. With ShipStation, you can import orders from over 100 marketplaces, manage order inventory, create domestic and international shipping labels, and automate customer updates when orders have shipped.
STEP 1: Enabling the ShipStation API in WSM
- Contact WSM to enable the ShipStation API.
- Create a ShipStation account.
STEP 2: Create a user in WSM for ShipStation
- Log into your WSM Admin
- Use this help page to create a WSM User. It is recommended that your user name is your site tag and ShipStation. Your tag can be found on the Admin Dashboard below the charts. ie TAGshipstation. This user account should only be used for the store connection; users should not use this account to access WSM.
STEP 3: Connecting to ShipStation
To connect your WSM store to ShipStation, do the following:
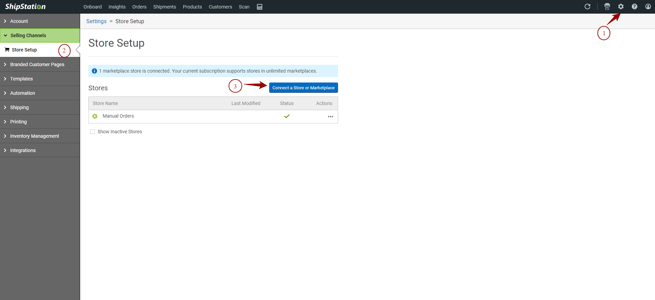
- Go to Account Settings.
- Select Selling Channels from the left-hand sidebar and choose Store Setup.
- Click Connect a Store or Marketplace.
- Choose Custom Store.
- Enter the requested information into the form. See Notes below.
- Test your connection using the Test Connection button.
URL to Custom XML Page: https://DOMAINHERE/api/shipstation
Username: User you created in STEP 1 above
Password: Password for the user you created in STEP 1 above
The table below provides details about the form fields in the connection window:
|
URL to custom CML page |
The location of your web endpoint. HTTPS is recommended. |
| Unpaid Status | The name of the system status indicating an order is unpaid and not ready to be shipped. Multiple statuses may be separated by a comma. |
| Paid Status | Name of the system status indicating an order is paid and ready to ship. |
| Shipped Status | Name of the system status indicating an order is shipped. |
| Canceled Status | Name of the system status indicating an order is canceled. |
| On-Hold Status | Name of the system status indicating an order is on hold. |
Order Status
- The order statuses set up in ShipStation must mirror the order statuses in WSM to flow through.
- ShipStation only offers a limited amount of fields to add order statuses, so pick the statuses you use the most.
- These are the options in WSM
- new
- processing
- backorder
- complete
- held
- canceled
- fraud
- deleted
- ready_to_ship
- return
- shipped
The status fields map WSM's order statuses to ShipStation's order statuses to determine where orders will import in ShipStation. These fields are case sensitive.
Once the connection is complete, ShipStation communicates with the URL endpoint to obtain order information.
STEP 4: Integrating ShipStation with WSM
- Log into WSM
- Hover over Systems
- Click Configuration
- Click on the General tab
- Enter the Username and Password for the account you created above in STEP 1
- In Shipstation click on the gear in upper right hand corner
- Click on Account in the left menu
- Then click API Settings
- V1 API , click Generate Key, specify 12 months for expiration
- Copy and paste the API Key and API Secret from Shipstation to WSM
- Click Save Changes
STEP 5: Importing Orders
- In ShipStation, click the Update All Stores icon in the upper right hand corner
- Select the WSM Store Name
Note: the Item ID that is sent in the API to ShipStation is based on the ID selected in the System>Configuration>Catalog tab